Overview
The Manufacton plugin for Revit enables you to unlock and connect your model data with downstream workflows to manage, track, and optimize your prefab production and materials in Manufacton.
Through the Manufacton plugin for Revit you can:
- Quickly and easily create production or material orders through automated workflows to streamline the handoff of packages from detailing to the shop.
- Map and pull critical data from the model such as costcodes, Catalog ID, measurements, and more.
- Automatically generate and link Revit sheets with their corresponding production or material orders, and dynamically link them through BIM360 Docs, eliminating the need for timely PDF creation and management. With this capability, your material and production orders will always have the latest drawing sheets, automatically.
- Share and visualize status information through the model with our integrations with BIM360 Docs and Navisworks. Once your packages are created through Revit, Manufacton will always update your model with the latest status information allowing your project teams to always be in sync with where an order is.
This article will cover, in-depth, the following:
- Where to get the plugin
- What versions of Revit are supported
- The User Interface
- Creating Prefab Packages
- Creating Production Orders
- Creating Material Orders
- Linking Model objects to existing orders in Manufacton
- Working with Existing Packages and Orders in Manufacton
- Managing and Applying Assembly Catalog
- Sending Log Files
- Overview Video
Where to get the plugin
The plugin can be downloaded from Download for the latest Revit Plug-in.
What versions of Revit are Supported
The Manufacton plugin is supported in Revit 2025, 2024, 2023, and 2022.
The User Interface
The Toolbar
The interface has been designed so users who primarily work in Revit do not have to leave that interface to create, link or update orders in Manufacton.
All interactions with Manufacton via Revit are conducted in one simple Manufacton toolbar:

The toolbar consists of eight (8) elements (from left to right):
- Create Prefab (addressed below in full detail)
- Production Order (addressed below in full detail)
- Material Order (addressed below in full detail)
- Link (addressed below in full detail)
- Get Order (addressed below in full detail)
- Catalog Entry *addressed below in full detail)
-
Sync
- The Sync function synchronizes the Revit model objects to the Manufacacton items updating which objects have been associated with items. This updates data in both systems and colors the model objects with the appropriate stage color. There are two types of Synch:
- Quick - which updates the model based on changes within the current session
- Deep - which synchronizes the model and includes changes made by users in other Revit sessions (Note: A Deep synch can take a significant amount of time depending on the model size and the number of items to synch.
- The Sync function synchronizes the Revit model objects to the Manufacacton items updating which objects have been associated with items. This updates data in both systems and colors the model objects with the appropriate stage color. There are two types of Synch:
-
Option
- The Option function allows users to change their initial Project, Parameter and Bindings settings (see "Logging in" below for details on those settings
-
About
- To provide information on the specific build of the plugin being used.
Logging in
Each time you open Revit with the plugin initiated, you will need to validate your Manufacton credentials to access the plugin tools. The same login by which you access the web and mobile app is used to validate the Manufacton plugin for Revit:
Note:  If the users Mobile Login permission is set to "Disallow", the Revit Plugin
       will receive the message:

           Your Manufacton account only has view permissions. Please
           login through a web browser.

       Please see the KB Article on Permissions for more information.
Selecting the Manufacton project
Once you have provided the credentials, you can select the project to which the model you are working on should be connected.
Assigning Parameters

Manufacton can leverage any Revit parameter to help group model objects to perform various functions:
- For Identifying what model objects belong together associated with an item in a Material, Production, or Prefab Order.
- All of the model objects with the same value for a given parameter will be grouped together making it much easier to associate multiple objects to a single item simple.
- Up to three parameters can be predefined and then selected when the model object association occurs.
- Be aware that if the secondary and tertiary parameters are entered, they MUST BE PRESENT in the model objects for proper grouping to work. If only one parameter is going to be used to group items, only one parameter should be entered.
- Standard and Shared Parameters can be selected.
- This makes the process of associating multiple objects that make up a spool, assembly, module, kit, cut sheet, package, etc., etc. as simple as possible.
- For .rvt files that will be uploaded into BIM360 Docs and also have production drawing sheets, a sheet parameter can be provided which aids in the automatic and manual selection of sheets that should be associated with an order. When an order is being created a value (or partial value) for the specified parameter can be set to narrow the results of the sheets automatically selected for the order.
- For automated Bills of Materials, a parameter can be selected to explicitly exclude model objects with a given value. A good example of a model object that may want to be excluded from a BOM is "weld joints". Creating a parameter called "BOM_Exclude" (or similar) and setting it to "Yes" will ensure those items are not included in an automatically created Material Order.
- For Identifying what model objects belong to a Kit Prefab Package,
- Standard and Shared Parameters can be selected.
-
Note: All parameters entered into the Options Dialog are case sensitive
      and must exactly match the spelling, case and use of special
      characters that are in the Revit model.
-
- Standard and Shared Parameters can be selected.
Bindings
The Bindings sub-tab allows you to associate Revit parameters to Manufacton Material parameters when BOMs are created.
- Each Revit Category is available to map from. Those parameters can be pushed in from Revit into Manufacton's item properties, including:
- Item ID
- Item Name
- Zone
- Install Loc
-
Catalog ID
- Both Part and Assembly Catalog IDs can be leveraged - best practice is to leverage one common parameter for both.
- Qty
- Measure
- Measure Unit
- Notes
- Cost Code
- Weld Length - Very similar to "Measure", "Weld Length" is meant to bind a shared parameter from the object type selected and push the sum of the values of those object's parameter into each Production Order for tracking purposes.
Notes:
     o Only users who are part of a permission set which has the "Individual
       Project Settings" set to Edit can modify bindings:


      Please see the KB Article on Permissions for more information.

     o When the Weld Length binding is made and a value is pushed into production
       orders, that value will be displayed in the "More Details" section of
       the Order.  There is also a table in analytics which enables reports
       on weld lengths per production order.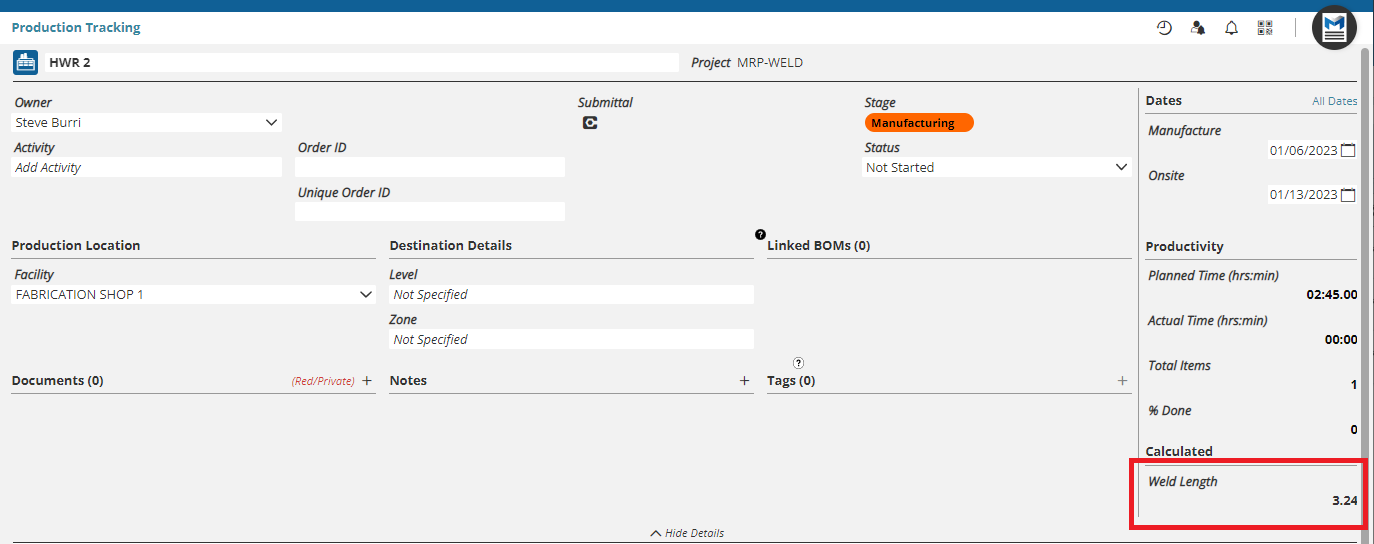
Creating Prefab Packages
- Creating a new Prefab package (in the Planning Stage) is accomplished by selecting Create Prefab. Those prefabs can be created one at a time using:
-
Create Single
...or multiple at once with: - Create From Object Package
Creating Individual Prefab Packages
When the Create Single is selected, a Prefab Planning "card" is started in Revit.
- Provide the package a name
- Provide a Coordinate by date (the date by which production/shop drawings can be "safely" started with little change of design change)
- Provide an Onsite by date (the date by which the order needs to be delivered to the site)
- Add any additional links to or uploads of Documents
- Sheets from the Revit model (for models to be linked-to in BIM360 Docs) can be made (manually or automatically using the Sheet Linking parameter)
- There are two options available when you Add Cad Object Info:
- Individual Manufacton Items - Creates a separate Item in the prefab package for each Revit object selected
- One Manufacton Item - Creates one Manufacton item and associates all of the selected Revit objects to that item
-
Manufacton Assembly - The items added will be considered Manufacton “Assemblies” and look into the Assembly Catalog. See the Planning Packages for detail on the use of assemblies in prefab Packages.
Note: If Revit objects which do not have an Assembly Catalog ID are
      selected with the “Manufacton Item” option set, an item named
      “non assembly item” added to the order and those object will be
      associated with that item.
- Selecting the "+" to Add Item, two options are provided:
- Create from Single - Allows you to manually select Revit objects to be associated with the Item(s).
-
Create from Spool - Allows you to leverage the "Grouping Parameters" to select all objects with a given value for that parameter.
When Create from Spool is used, an additional dialog box is provided allowing you to select the grouping parameter, which then provides a list of the unique values for that parameter and defaults the name of that item to be that value (with the option to change it prior to adding).
- To associate model objects manually select the fly-out to the left of the item.
- Double-click on the Link button to enter the Revit interface and select the model object(s) which are represented by the item
Note:  It is also possible to pre-select the Revit model elements (by any
       method available in Revit - i.e. filtering tools) and then
       double-click on the Link button.
- Once those items are selected, Finish needs to be selected.
- Create from Spool - Allows you to leverage the "Grouping Parameters" to select all objects with a given value for that parameter.
Creating From Object Packages
When creating prefab packages from object package (in-batch) is selected, an additional dialog is provided.

- Select the Group By parameter (from the assigning parameters)
- All model objects with the same parameter value will be grouped as the Order Name and can be selected one at a time or all can be selected.
- To narrow down a long list, the list of Order Names can be Searched for
- The prefab package needs an Onsite date set as well as a...
- Coordinate by date
- To help ensure the order represents the expected model objects, the ability to Isolate those associated model objects is available.
Note: To turn off the isolation, the Revit function to "Temporary Hide/Isolate" tool is used.
- If the .rvt file also has drawing sheets that will be uploaded into BIM360 Docs, the sheet parameter and value can be provided which aids in the automatic and manual selection of sheets that should be associated with an Order. The value (or partial value) for the specified parameter can be set to narrow the results of the sheets automatically selected for the order.
- The Auto Add function looks for all the sheets (with the given parameter value) in which the items in each order are present and makes those available to the list.
- Selecting an Order (in the upper section) will display the Items which will be added to the order and allow several Manufaton parameters to be set for those items if desired.
Creating Kits
Kits have some special functions within Manufacton, if not familiar with Kits please review the KB Article on Kits prior to using this function in Revit.
Regardless of how the kit is created, the items within the kit must have an established Catalog ID that represents an assembly Manufacton.
Kits can be created from the plugin via two methods from the Create Prefab menu:
- Create Single Kit
- Find/Create Multiple Kits
Create Single Kit
If "Create Single Kit" is selected, the following dialog is provided:
- Enter the Name of the kit
- Provide a unique Kit ID
- Provide the necessary Dates
- Add any Documents or associated Sheets
- Select to Add Items
- Either, Create from Single or Create from Spools is available to select the Revit items
- Note - If Create from Spools is selected, the necessary parameter will need to be mapped as an "Order Setup" parameter in the Assigning Parameters section of this document.
- Save links the items and creates the Kit Package.
Find/Create Multiple Kits
If the "Find/Create Multiple Kits" option is used, Manufacton will use the established "Kit's Revit Parameter" as described in the Assigning Parameters section of this document.
When the "Find/Create Multiple Kits" option is selected, the following dialog box is provided:
- A list of all Kits found in the model is provided
- One, multiple, or all of those kits can be selected.
- Note - The default name for the kit will be the Kit ID, this name can be changed one at a time in the interface.
- If a kit is selected in the upper section, the list of associated Assemblies is provided
- A Default Kit Date can be established for all the kits to be created
- If a kit has a unique set of dates is required for one of the kits, the Selected Kit Date can be used to set the dates for those kits
- Once all of the kits and dates are defined, the selected kits can be created
Creating Production Orders
- Creating a new Production Order (in Coordination or Detailing) is accomplished by selecting Production Order. Those prefabs can be created one at a time using:
-
Create Single
...or multiple at once with: - Create From Object Package
Creating Individual Production Orders
When the Create Single is selected, a Production Order "card" is started in Revit.

- Provide the Order a name
- Select in which Stage the order should be created (Coordination or Detailing)
- Provide all the required due dates, from Coordination through Onsite
- Select an appropriate Template (optional)
- Optionally, all of the associated model objects can be captured as part of an associated BOM (Material Order) for the Production Order.
- This Material Order will use the Bindings set-up in the Bindings sub-tab in setup to associate Revit parameters to Manufacton Material parameters.
- This is also where the BOM Exclusions come into play to exclude certain model objects which should not be included in a BOM can be excluded
- Add any additional links to or uploads of Documents
- Sheets from the Revit model (for models to be linked-to in BIM360 Docs) can be made (manually or automatically using the Sheet Linking parameter)
- To help ensure the order represents the expected model objects, the ability to Isolate those associated model objects is available.
Note: To turn off the isolation, the Revit function to "Temporary Hide/Isolate" tool is used.
- There are two options available when you Add Cad Object Info:
- Individual Manufacton Items - Creates a separate Item in the prefab package for each Revit object selected
- One Manufacton Item - Creates one Manufacton item and associates all of the selected Revit objects to that item
-
Manufacton Assembly - The items added will be considered Manufacton “Assemblies” and look into the Assembly Catalog. See the Planning Packages for detail on the use of assemblies in prefab Packages.
Note: If Revit objects which do not have an Assembly Catalog ID are
      selected with the “Manufacton Item” option set, an item named
      “non assembly item” added to the order and those object will be
      associated with that item.
- Selecting the "+" to Add Item, two options are provided:
- Create from Single - Allows you to manually select Revit objects to be associated with the Item(s).
-
Create from Spool - Allows you to leverage the "Grouping Parameters" to select all objects with a given value for that parameter.
When Create from Spool is used, an additional dialog box is provided allowing you to select the grouping parameter, which then provides a list of the unique values for that parameter and defaults the name of that item to be that value (with the option to change it prior to adding).
- To associate model objects manually select the fly-out to the left of the item.
- Double-click on the Link button to enter the Revit interface and select the model object(s) which are represented by the item

Note:  It is also possible to pre-select the Revit model elements (by any
       method available in Revit - i.e. filtering tools) and then
       double-click on the Link button.
- Once those items are selected, Finish needs to be selected.
13. Material Templates can be applied on an item by item basis - one Material Order per item will be created and allocated to the Production Order.
Creating Production Orders in Batch
When creating Production Orders in batch is selected, an additional dialog is provided.

- Select the Group By parameter (from the assigning parameters)
- All model objects with the same parameter value will be grouped as the Order Name and can be selected one at a time or all can be selected.
- To narrow down a long list, the list of Order Names can be Searched for
- The Production Order needs an Onsite date set as well as a...
- Coordinate by date
- To help ensure the order represents the expected model objects, the ability to Isolate those associated model objects is available.
Note: To turn off the isolation, the Revit function to
"Temporary Hide/Isolate" tool is used. - If Level and/or Zone are appropriate for the order, they can be included (Level and Zone values must be available in the Manufacton Project to be leveraged here - See the KB Article on Adding Project Levels and Zones).
- If the .rvt file also has drawing sheets that will be uploaded into BIM360 Docs, the sheet parameter and value can be provided which aids in the automatic and manual selection of sheets that should be associated with an Order. As this order is being created the value (or partial value) for the specified parameter can be set to narrow the results of the sheets automatically selected for the order.
- The Auto Add function looks for all the sheets (with the given parameter value) in which the items in each order are present and makes those available to the list.
- Optionally, all of the associated model objects can be captured as part of an associated BOM (Material Order) for the Production Order.
- This Material Order will use the Bindings set-up in the Bindings sub-tab in setup to associate Revit parameters to Manufacton Material parameters.
- This is also where the BOM Exclusions come into play to exclude certain model objects which should not be included in a BOM can be excluded
- A Production Template can be applied as appropriate
- The Items that make-up the Order(s) can be viewed and various parameters can be updated
-
Material Templates can be applied on an item-by-item basis - one Material Order per item will be created and allocated to the Production Order.
Creating Material Orders
Creating a new Material Order is accomplished by selecting Material Order.
- Provide the order a name
- Provide the required dates:
- Fab/Order (optional)- by which the order needs to be placed
- Available (optional) - by when the materials need to be made available
- Ship (optional) - by when the materials need to be shipped
- Onsite (Required) - by when the materials need to be delivered
- Optionally, select a material Template
- There are two options available when you Add Cad Object Info:
- Individual Manufacton Items - Creates a separate Item in the prefab package for each Revit object selected
- One Manufacton Item - Creates one Manufacton item and associates all of the selected Revit objects to that item
- Selecting the "+" to Add Item, two options are provided:
- Create from Single - Allows you to manually select Revit objects to be associated to the Item(s).
- Create from Spool - Allows you to leverage the "Grouping Parameters" to select all objects with a given value for that parameter.
- Add any additional links to or uploads of Documents
- Sheets from the Revit model (for models to be linked-to in BIM360 Docs) can be made (manually or automatically using the Sheet Linking parameter)
When Create from Spool is used, an additional dialog box is provided allowing you to select the grouping parameter, which then provides a list of the unique values for that parameter and defaults the name of that item to be that value (with the option to change it prior to adding).
Once those items are selected, Finish needs to be selected.
Linking Model objects to existing orders in Manufacton
- Linking model objects to existing production orders (in planning or production stages) is accomplished by selecting Link. Those objects can be linked to:
-
Production Order items
...or - Kit Order items
Linking Model Objects to Production Orders
Model objects can also be linked to existing production orders in either the Coordination or Detailing stage
- Select the Group By parameter (from the assigning parameters)
- Select the Order Stage the existing production orders are currently in
- All model objects with the same parameter value will be grouped in the Spool to Link column and can be selected one at a time or all can be selected.
- To narrow down a long list, the list of Order Names can be Searched for
- To help ensure the order represents the expected model objects, the ability to Isolate those associated model objects is available.
Note: To turn off the isolation, the Revit function to
"Temporary Hide/Isolate" tool is used. - Optionally, for Production Orders being linked in Coordination or Detailing, all of the associated model objects can be captured as part of an associated BOM (Material Order) for the Production Order.
Notes:
       o Only Produciton Orders created in Coordination or Detailing will
         be provided the option to create a Material order (Planning and
         Manufacturing orders are excluded).
       o This Material Order will use the Bindings set-up in the Bindings
         sub-tab in setup to associate Revit parameters to Manufacton
         Material parameters.
       o This is also where the BOM Exclusions come into play to exclude
         certain model objects which should not be included in a BOM can
         be excluded.
Linking Model Objects to Kits
Model objects can also be linked to existing Kit Assemblies.

- All of the Kits with associated Assemblies will list and can be selected.
- The association is defined under the "Kit's Revit Parameter" and the "Assembly's Revit Parameter" as part of the Assigning Parameters process.
- To narrow down a long list, the list of Order Names can be Searched for.
- An Installation Location can be identified at this time.
- Levels and Zones (as appropriate) will be defined.
- If there is missing or conflicting information in the Revit model as to the Level and/or Zone, the ability to resolve those conflicts is made available.

- To help ensure the order represents the expected model objects, the ability to Isolate those associated model objects is available.
Note: To turn off the isolation, the Revit function to
      "Temporary Hide/Isolate" tool is used.
Linking Sheets to Production Order
There may be times that the supporting sheets for a production order are not yet created in the Revit model at the time the order is created from the model. In these cases, Manufacton has provided a tool to be able to quickly associate sheet links to existing production orders. This tool is found under the Link menu and is called Sheet to Production Orders.
The tool initiates a dialog that brings up all of the existing Production Orders currently in the project. All of the same tools which are available to associate Revit sheets to Production Orders when the order is being created are available in this tool as well, including:
- Setting a "Sheet Parameter" and value to limit the list of possible sheets to associate.
- Sheets can be added to several orders at a time...
- And can be added either manually or automatically.
- Sheets can be added to a single order, either manually or automatically.
- The Revit items which make up the Production Order can be isolated
- In addition, Filter tools to find a specific Order or Stage in which the order exists are available.
- Once the desired sheets have been added to the desired Production Order(s), those sheets can be linked.
Working with Existing Packages and Orders in Manufacton
Managing existing production orders via the plug-in is also possible using the Get prefab/Production/Material button,
Selecting any of these opens a dialog box with access to all of the project's order of the type you selected. Regardless of which type of order is selected, the first 25 orders of that type will be shown and the following options are available:
- Search for the desired order
- Browse to the next 25 orders
- And ultimately Open the desired order
For reference to those dialogues, see:
Note:  If Get Order is used to open a Kit Prefab or Produciton Order or
       and Assembly Production Order, adding new items is not allowed.  Items
       (Assemblies) can only be added to Kits via the Link Kit function.
Managing and Applying Assembly Catalog
The Catalog Entry button provides direct access to your company’s Assemblies / Parts Catalog through the plug-in (assuming you have the proper permissions to do so).
The User Interface
The entire Assembly Catalog interface is within on dialog in the plug-in.
- Selected Revit Object Properties
- Assembly Search
- Assembly List view
- Add Assembly button
- Search Assembly by Parts function
- Associated Parts List view
- Add Parts button
With this feature, several functions can be completed:
- Examine, Assign and Modify the assembly to which a Revit object is associated (fundamentally, populate an Assembly’s Revit Parameter in the object)
- Search for an existing assembly based on the parts that make-up that assembly
- Create a new assembly to be associated with a Revit object.
- Change an assembly’s definition
Examining, Assigning & Modifying Existing Assemblies
To examine, modify or add an assembly associated with a Revit object, select:
- The Catalog Entry button
- The Revit object(s) to manage
- Note: The Revit objects must be of the same family types if more than one object is to be selected.
- Select Finish
- Assemblies that are already associated object(s) selected will automatically be filtered in the search results, otherwise, a full list of assemblies is returned
- Note: It is possible to modify the search string at any time
- Selecting any of the assemblies will return a list of the parts and quantities associated with the selected assembly.
- A different assembly can be selected to modify the current selection.
- Note: The “radio button” which is filled with the black dot is the assembly that is currently selected to be associated to the Revit object(s)
- Selecting the Apply button will apply the Catalog ID of the chosen assembly to the Revit objects
Find Existing Assemblies from their parts
If you are not sure if an assembly for a specific configuration of parts already exists in your catalog, it is possible to search the Assembly database based on a specific set of parts, and those part’s quantity.
To search for existing assemblies based on parts:
- Select Search Assemblies by Parts
- Select the Add button and select the parts and quantities which make-up an assembly
- Select Update Parts Search
- If there is an assembly in the Assembly Catalog which has the given part/quantity combination, that assembly will be returned
- Note: If no assembly has the give part/quantity combination a dialog with “No Assemblies match this Parts List!” will be returned
- Select Stop Search to end the search.
Creating a New Assembly
If there is no existing assembly that properly represents the design intent of the Revit object a new assembly can be created within the dialog:
To add a new assembly:
- Select the Add Assembly button
- Select whether to Create New Catalog Entry or Clone Selected Catalog Entry
- Give the new assembly the necessary information (“Name” is the only required field)
- If the Catalog ID field is left blank, a guaranteed-unique ID will be given to the assembly, in part, based on the Category selected.
- If no Category or Sub Category is selected, “Other” will be used for both.
- Select the Add Parts button
- From the Add Parts dialog, select the parts and quantity of each part that make-up the assembly
- Once the assembly is fully defined, select the Update Catalog Entry button to create the new assembly
Modifying the Definition of an Existing Assembly
If the Design intent of an assembly has changed, it is possible to change the definition of that assembly within the plug-in’s interface.
Note:  After an assembly is used as part of a production order or Kit,
       modifying the definition of that assembly can have unintended
       consequences and should be done rarely and with caution.
To update the definition of an existing assembly:
- Select the Edit Pencil next to any of the Assemblies
- Add new Parts from the Add Parts dialog
- Modify the Quantities of any of the existing parts
- Delete any parts
- Select Update Catalog Entry when the modification is complete
Sending Log Files
There may be times when our Support or Implementation teams ask you to send the log files from the Manufacton Plugin for Revit. The LATEST log file can be sent automatically from the About menu.
Other log files from previous sessions can be found on the user's computer in:
C:\Users\<USER_NAME>\AppData\Local\Manufacton
Overview Video
Here's a somewhat longer video (~30 mins)... you may want to grab a cup of coffee or a snack and try to have a half-hour or so dedicated to this training video:
If you have specific features on which you are looking to gain insights, use the links below to begin the video at the desired topic:
Comments
0 comments
Please sign in to leave a comment.