Overview
Manufacton's Material Delivery Manager has been designed as the execution tool for managing the intersection of a project's Schedule, Submittals, and the Material Delivery Log.

Schedule - Manufacton currently supports the import of schedules from such tools like Primavera P6, Microsoft Project, etc.
Submittals - Manufacton currently has direct integration to Procore for Submittal Management
Material Delivery - Manufacton, itself, acts as the Material Delivery Log, with dates driven from the schedule, Procore, and Manufacton's customizable catalog of materials.
Various pieces of data are sourced and maintained from different systems including:
- Schedules
- Submittals
- Manufacton

This article will cover the following topics:
Pre-Work
To leverage the full potential of the Material Delivery Manager, there are a few things that need to be configured before kicking off a project:
- An import template for importing and updating the Schedule needs to be established
- Manufacton's integration with Procore for Submittal data needs to be initiated
- The Manufacton Parts Catalog needs to be populated
- The Manufacton Color Scheme can be configured
Schedule Import Template
A template of the .xlsx format required to import the Scheduling information is available in the Import Templates KB Article, specifically the section on Schedule.
Procore Integration
There is a critical step to configuring Manufacton's integration with Procore that is documented in the KB Article Setting up the Procore Embedded Experience.
Parts Catalog
The Parts Catalog is where the list of all possible material items which may be delivered as part of the Submittal and MDL process is maintained. This list is part of a company standard and is available to all projects.
It is recommended, for the MDM process, that the list of items be as generic as possible. The details of the materials being delivered can be included in the item's notes field or as part of the Activity name.
Information on setting up the Parts catalog is available in the Set-up section of the Assembly / Parts Catalog KB Article.
Color Scheme
The color scheme for the various stages of the Submittals, Material, and Shipping Order can be controlled on a company-wide basis. Information on the meaning and configuring colors within Manufcton is available in a KB Article on Color Schemes.
Set up
For each project to leverage Material Delivery manager, four (4) steps need to be completed:
- Set up a project - See the KB Article on Creating a New Project.
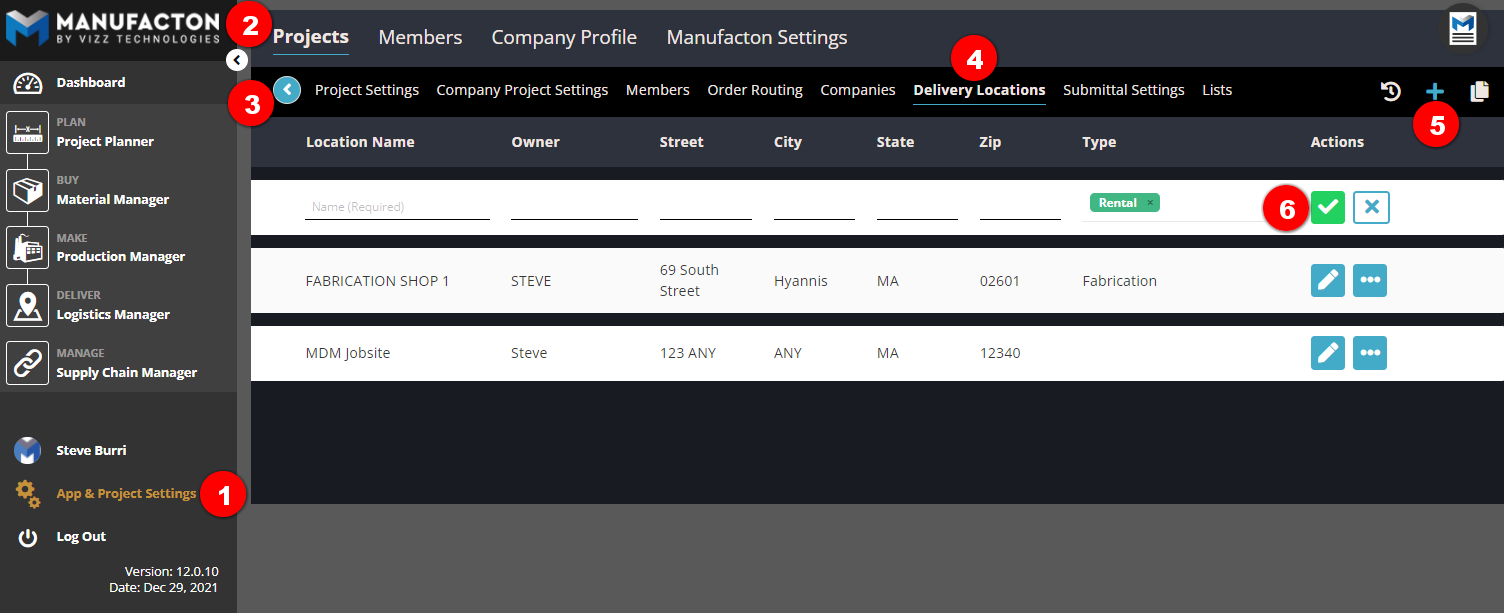
- As part of the project setup, it is critical to also add all the Project Locations. To add Project locations:
-
- Select App & Project Setup
- Ensure that the Projects tab is selected
- Select the newly added project
- Select Delivery Locations
- Select the add (+) button
- Enter necessary Location information and save the location.
-
- As part of the project setup, it is critical to also add all the Project Locations. To add Project locations:
- Add the necessary users to the project - See the KB article on Adding and Editing Users in Manufacton.
- Link the Project and Project team users with Procore - See the KB article on Linking Manufacton Projects and Users to Procore Projects.
- Make sure the Vendors (a/k/a sub-contractors) set to manage the submittals in Procore are also in Manufacton. The Vendor field will be driven from the submittal if the Responsible Contractor is defined in the submittal and that same contract is available as a Vendor in Manufacton. Ensuring parity is handled through a simple export from Procore and import into Manufacton:
- Select App & Project Setup
- Select Company Profile
- Select Vendors
- Select Import Excel - See the KB Article on Import Templates for Vendors for the Vendor import template.

Usage
This section includes the following topics:
- Import the Scheduled Activities
- Hide / Remove Scheduled Activities
- Unhide Hidden Activities
- Link the Associated Submittal from Procore to each Activity
- Associate the appropriate "parts" to be delivered by the activity
- Create a Shipping Order associated with the Activity's Materials
- Receiving Shipments
- Updating the Schedule
- Mass Updates
- Managing Conflicts
- Cloning Activities
- Completed Activities
All of the work completed for Material Delivery Manager is done in the Schedule tab of the Project Planner module.
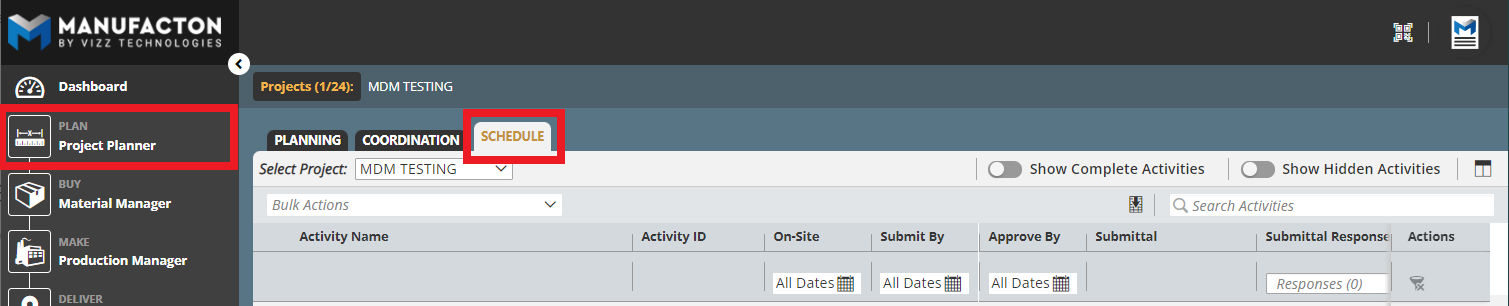
Import the Scheduled Activities
Scheduled activities are imported from your scheduling tool (i.e. Primavera P6):
- Select Import Excel - See Import Templates KB Article, specifically the section on Schedule for the excel template format.
- Select Choose File and select the excel file to import.
- Ensure the columns in the excel file are mapped to the data fields for Manufacton
- Select Import to import the activities

The schedule import will fill the following fields for each imported Activity:
- Activity Name
- Activity ID
- Onsite Date
Hide / Remove Scheduled Activities
Once activities are imported, there may be some which are not going to be tracked. It is possible to either completely Remove or Hide Activities.
To Hide or Remove a single Activity:
- Select the ellipse next to the Activity
- Select either Hide or Remove

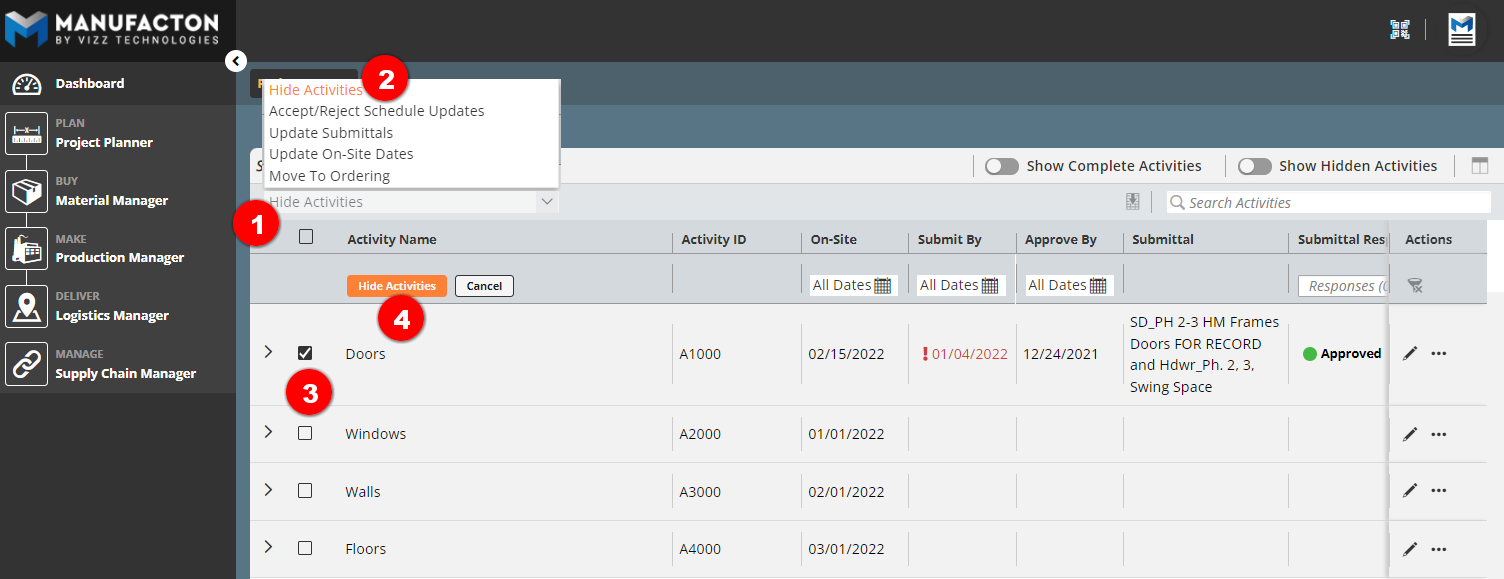
To Hide multiple Activities at once:
- Select the Bulk Action button
- Select Hide Activities
- Select the Activities to hide
- Select the Hide Activities buttons
Note:  "Hidden" activities will remain hidden if they are reimported as part
       of a schedule import/update in the future.  "Removed" activities will
       be visible again if they are part of subsequent schedule imports.
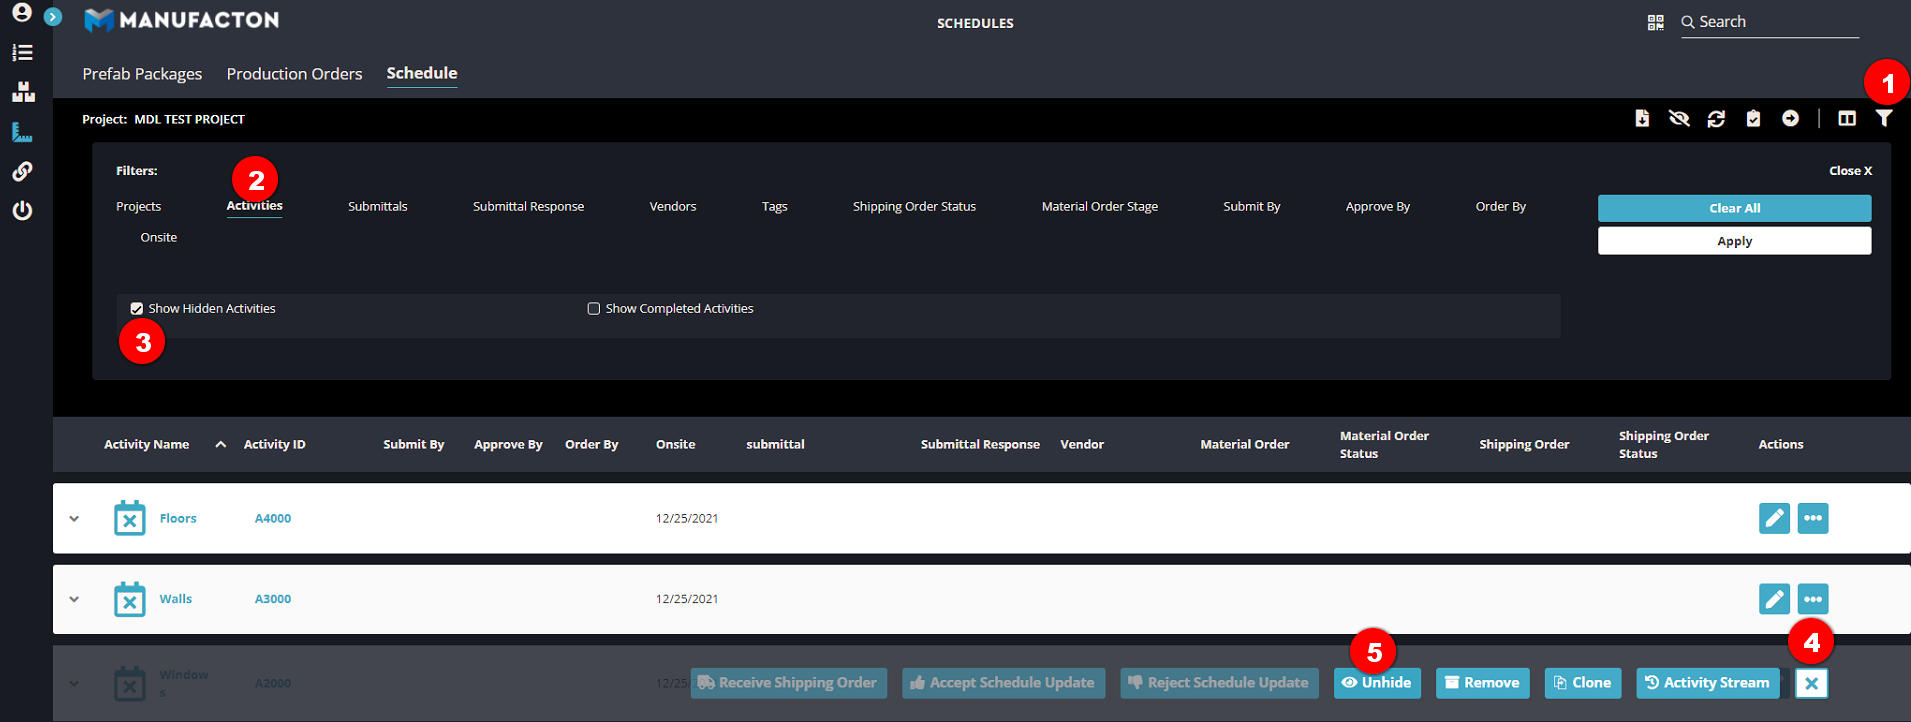
Unhide Hidden Activities
If you again want to track an Activity that has been hidden, it is possible to unhide it:
- Select Show Hidden Activities tool
- Select the ellipse next to the Activity which had been hidden
- Select Unhide
Link the Associated Submittal from Procore to each Activity
The submittal manages several other pieces of data, including:
- Submittal name
- Submit By date
- Approve By date
- Current Submittal Response
- Associated sub-contractor as the Vendor
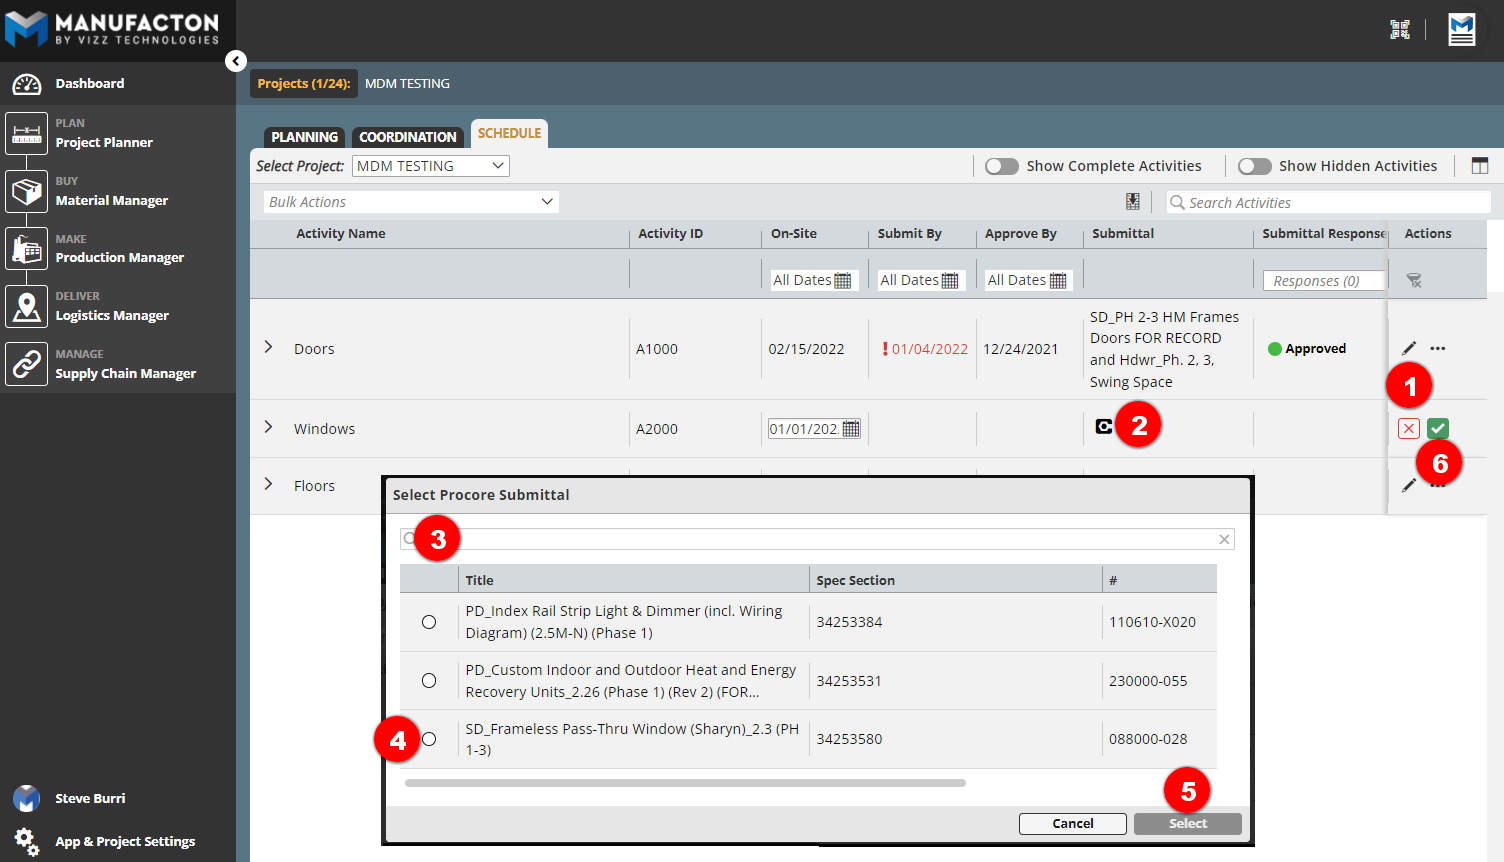
To link the submittal from Procore:
- Select the Edit pencil next to the activity to link
- Select the Link icon in the Submittal column
- Search the list of available submittals as necessary
- Select the submittal to link
- Select the Select button
- Save the Activity
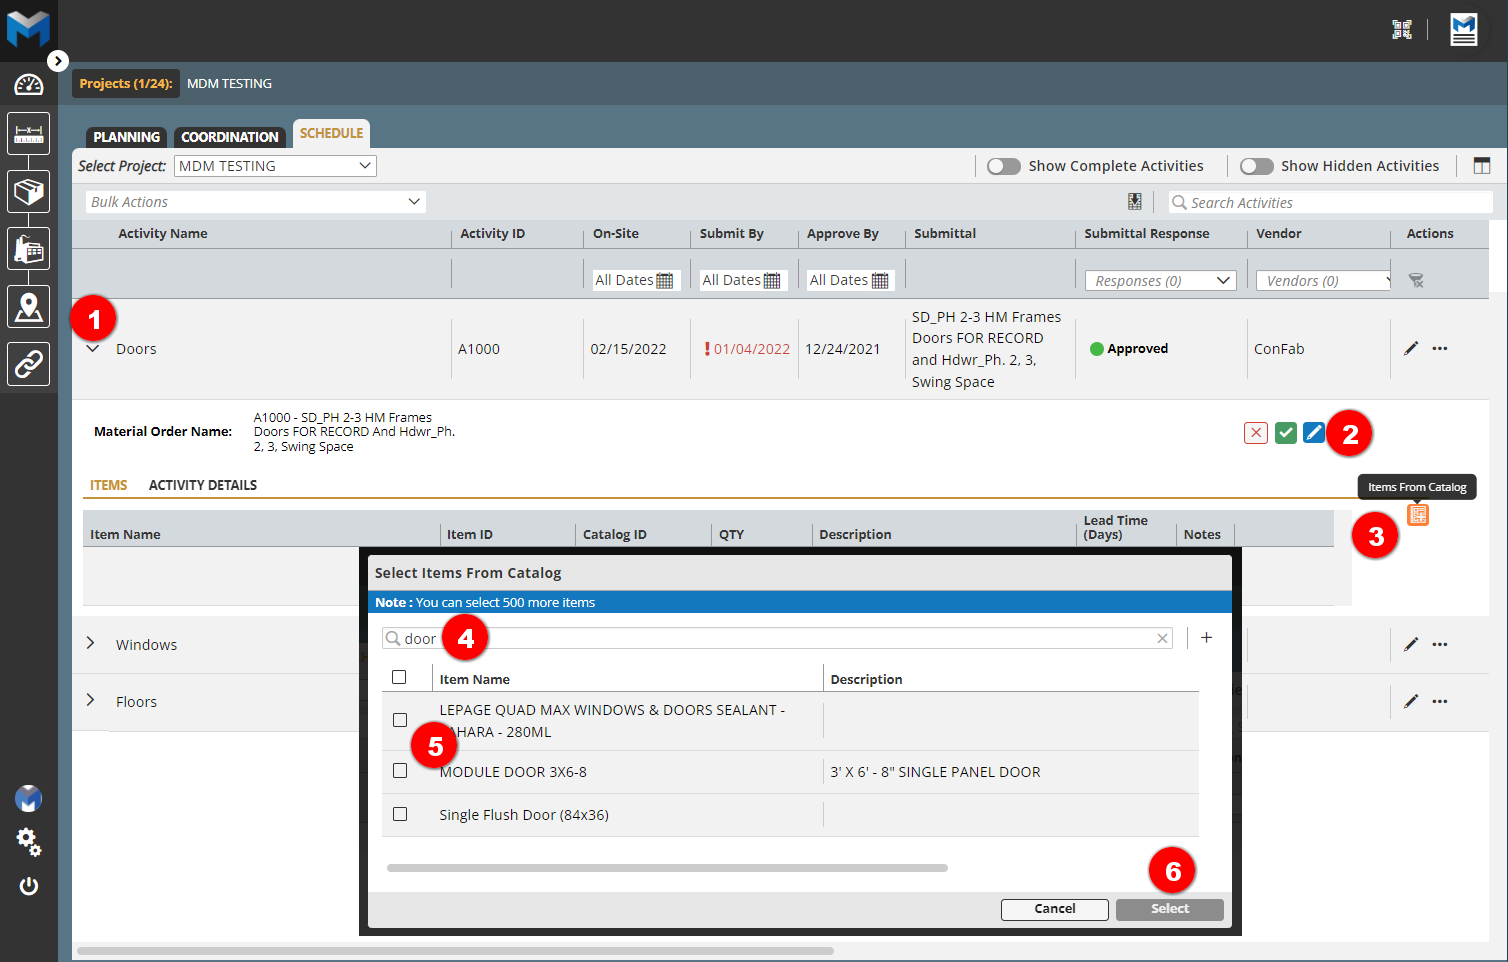
Associate the appropriate "parts" to be delivered by the activity
Once an Activity's associated Submittal has been Approved, the list of Material items can be associated with the Activity.
For each material item to be delivered as part of the activity, the following steps need to be taken:
- Open the fly-out button to expose the Items for the Activity
- Select the Edit pencil
- SelectImport from Catalog
- Search for the item(s) you want to add
- Select the item(s)
- Select the Selection button
- Verify the Vendor Lead Time Days to establish by when the order will need to be placed by the sub-contractor to meet the Onsite date (Order By Date = Onsite Date - Vendor Lead Time Days)
- Identify the specified Qty of the material to be delivered.
- Select the Save Checkbox.
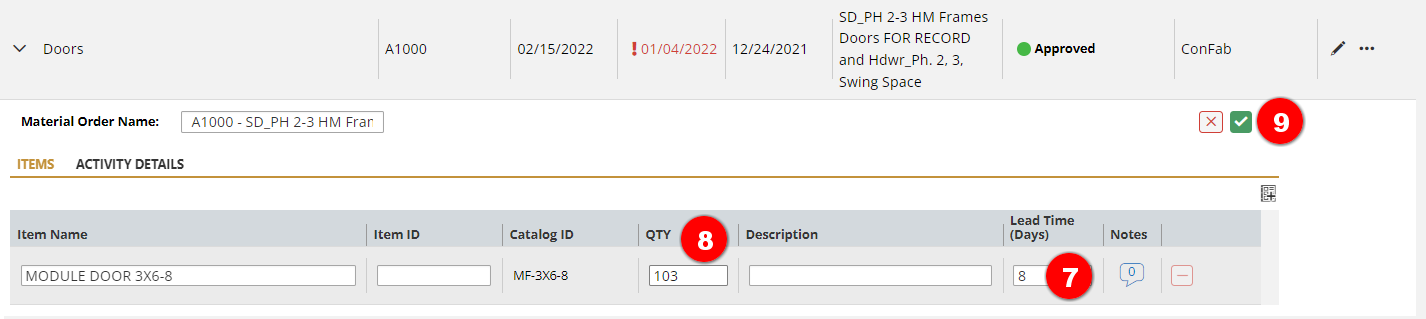
This process creates a "Material Order" in Manufacton which tracks those associated materials moving forward.
For material orders created via this process, an extra function is added to allow all of the critical dates to be tracked there as well, including the material's Release date.
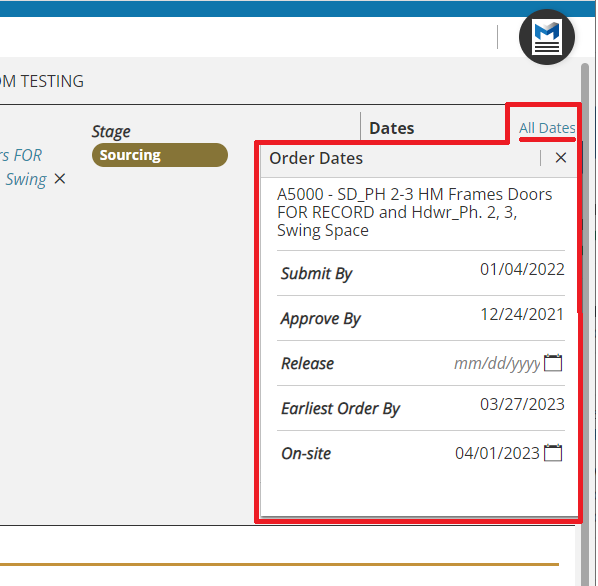
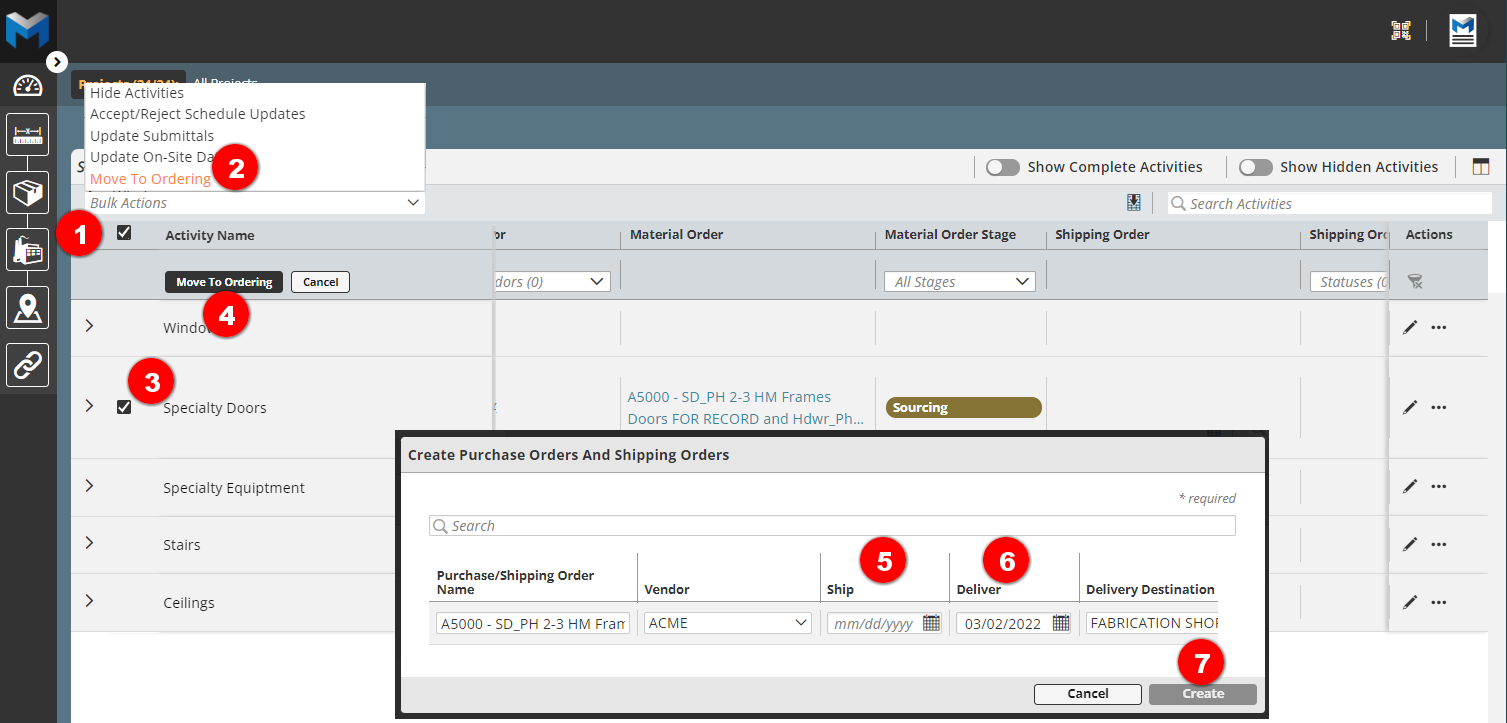
Create a Shipping Order associated with the Activity's Materials
Once the sub-contractor (Vendor) has confirmed when the materials are going to be shipped and delivered, a Shipping Order is created:
- Select the Bulk Actions tool
- Select Move To Ordering
- Select the Activitie(s) for which the Shipment is to be made
- Select the Move To Ordering button
- Enter the Ship Date provided by the sub-contractor
- Enter the Deliver Date provided by the sub-contractor
- Select Create
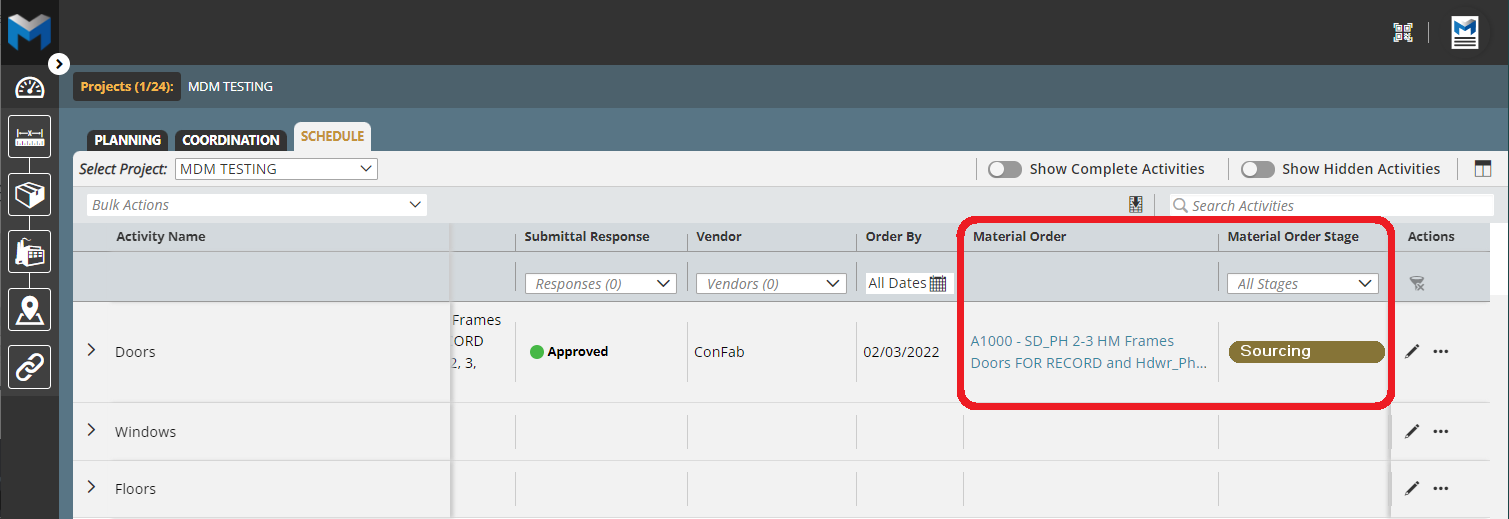
Back in the Schedule, that Shipping Order is now associated with the Activity
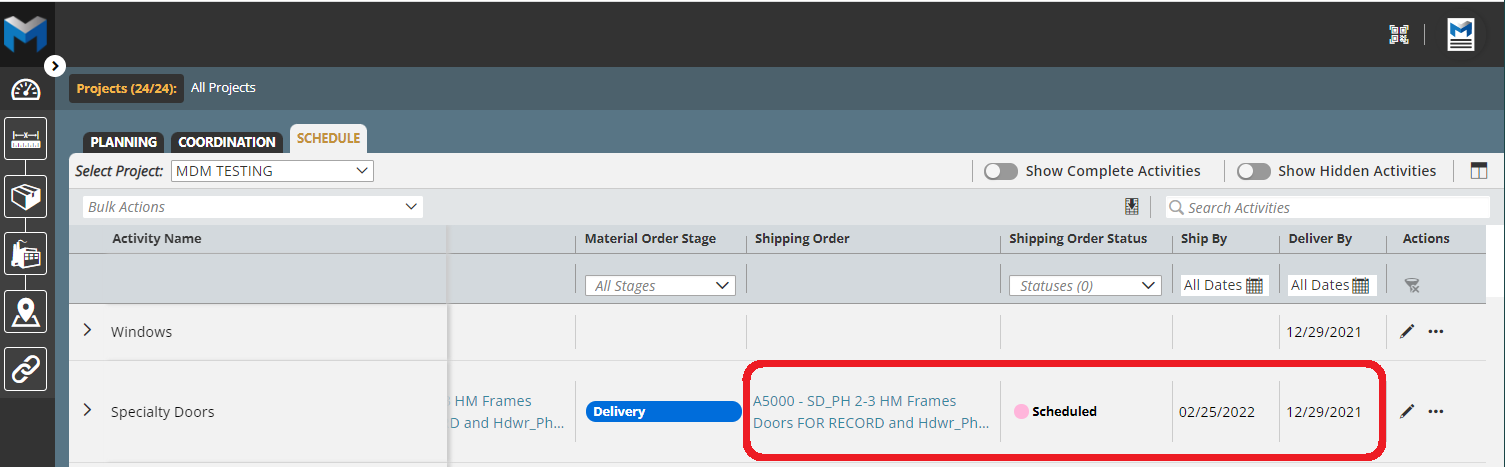
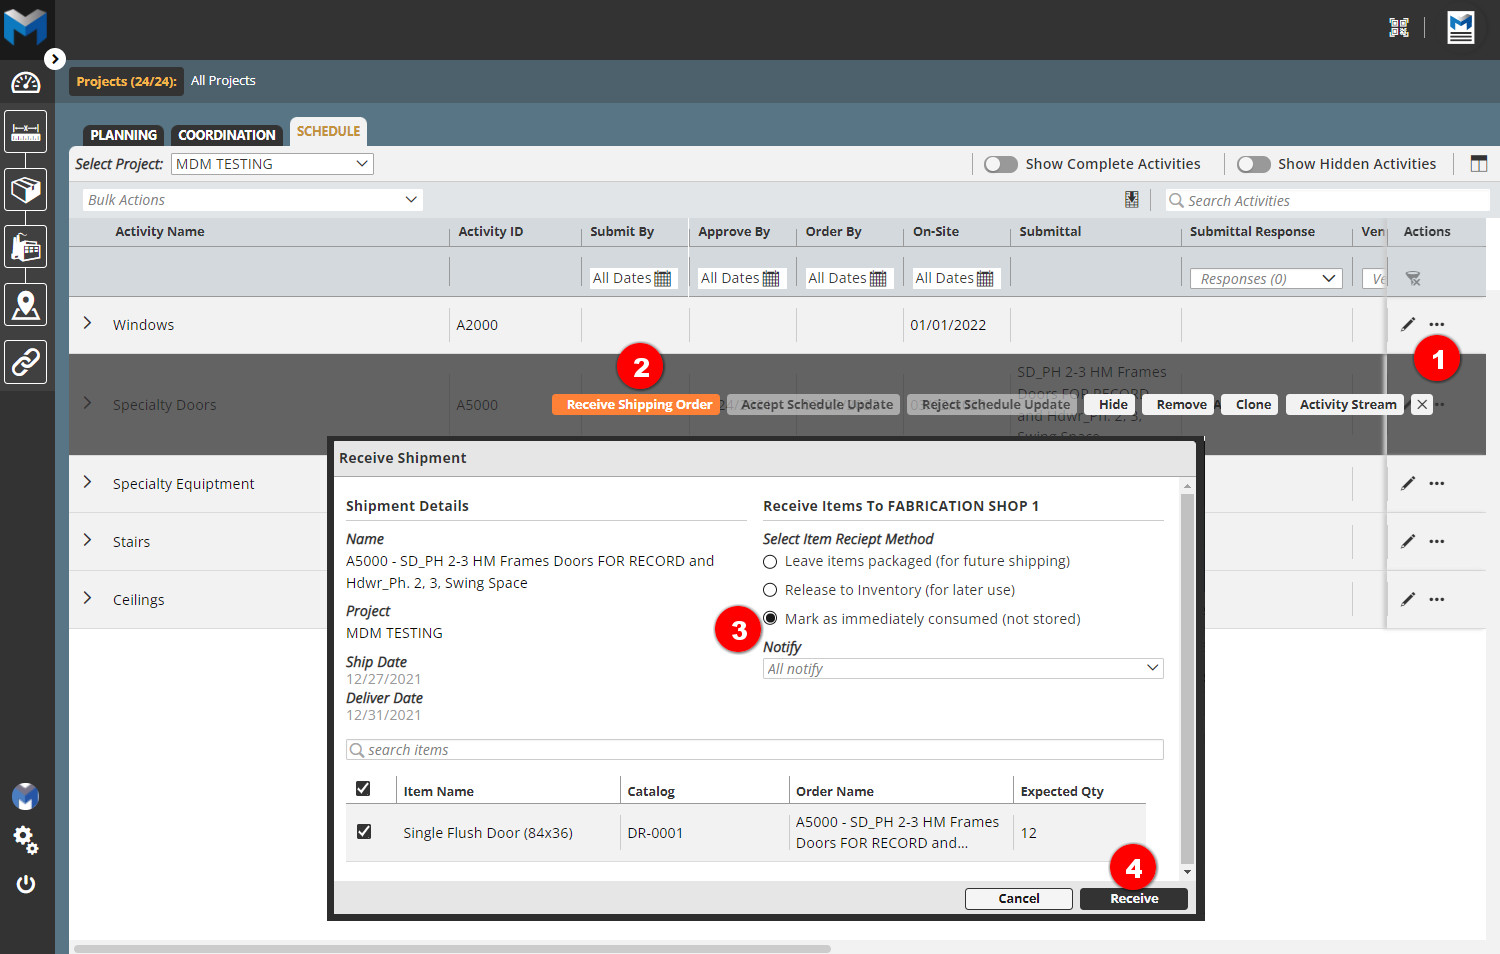
Receiving Shipments
Once it has been confirmed that the materials for an Activity have been delivered, the Activity's shipping order can be received:
- Select the ellipse (3 dot menu) next to the Activity to be received
- Select Receive Shipping Order
- Mark the Receipt Method as Mark a immediately consumed (not stored)
- Select Receive
Updating the Schedule
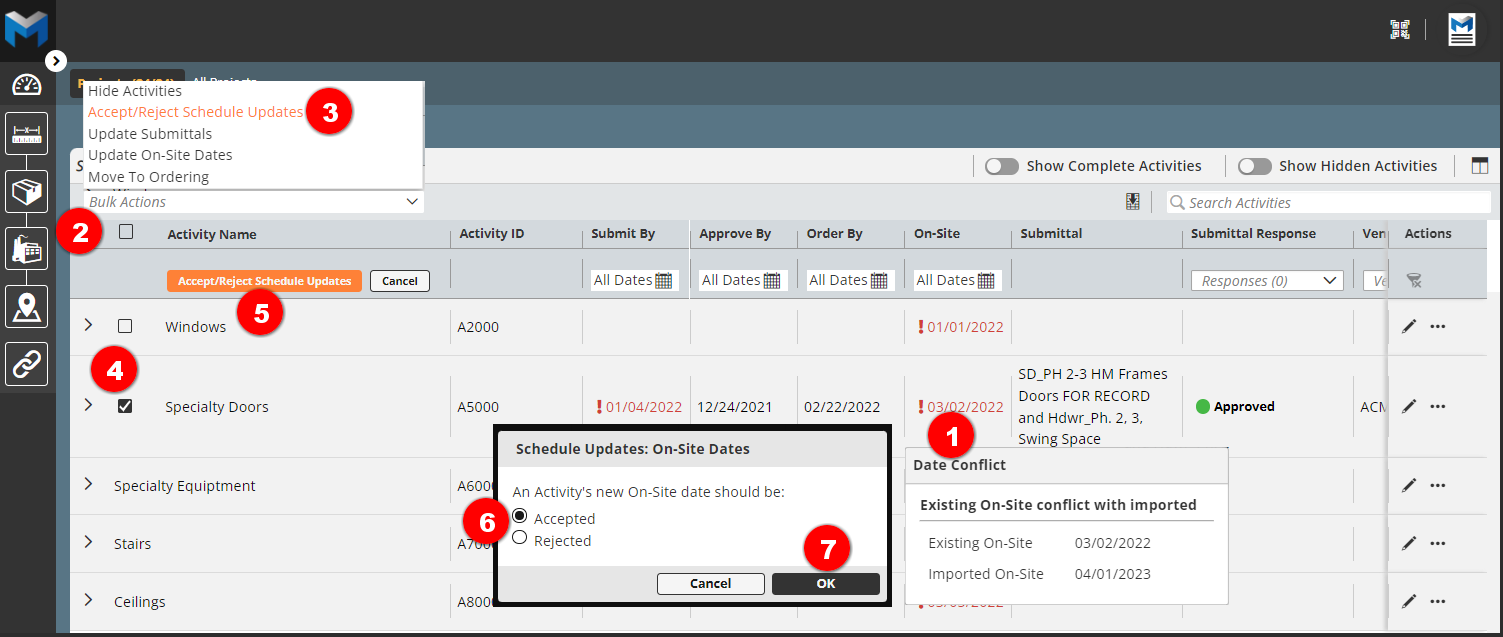
Subsequent imports of the schedule can be made to import new or update existing Activities (the Activity ID acts as the unique identifier). Once the update import is completed:
- Any affected Onsite dates will be flagged with an Attention Indicator.
- Select the Bulk Action tool
- Select the Accept/Reject Schedule Updates option
- Select the Activitie(s) to accept or reject the changed dates
- Select Accept/Reject Schedule Update
- Select to Accept or Reject
- Select OK
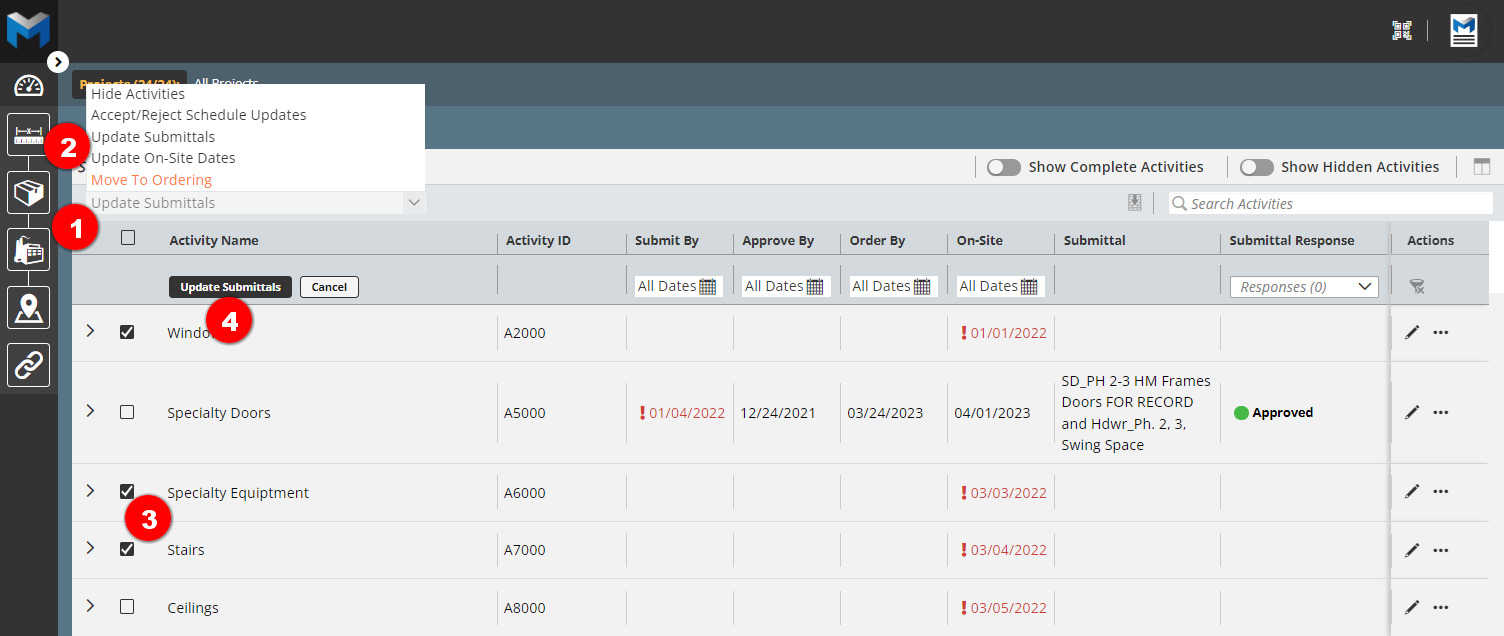
Mass Updates
It is possible to change values for multiple Activities at one time, including:
- Submittal
- Onsite Date
To mass update activities,:
- Select the Mass Update tool
- Select to update Submittals or Update On-Site Dates
- Select the Activities to Update
- Select Update Submittals and update the data as desired.
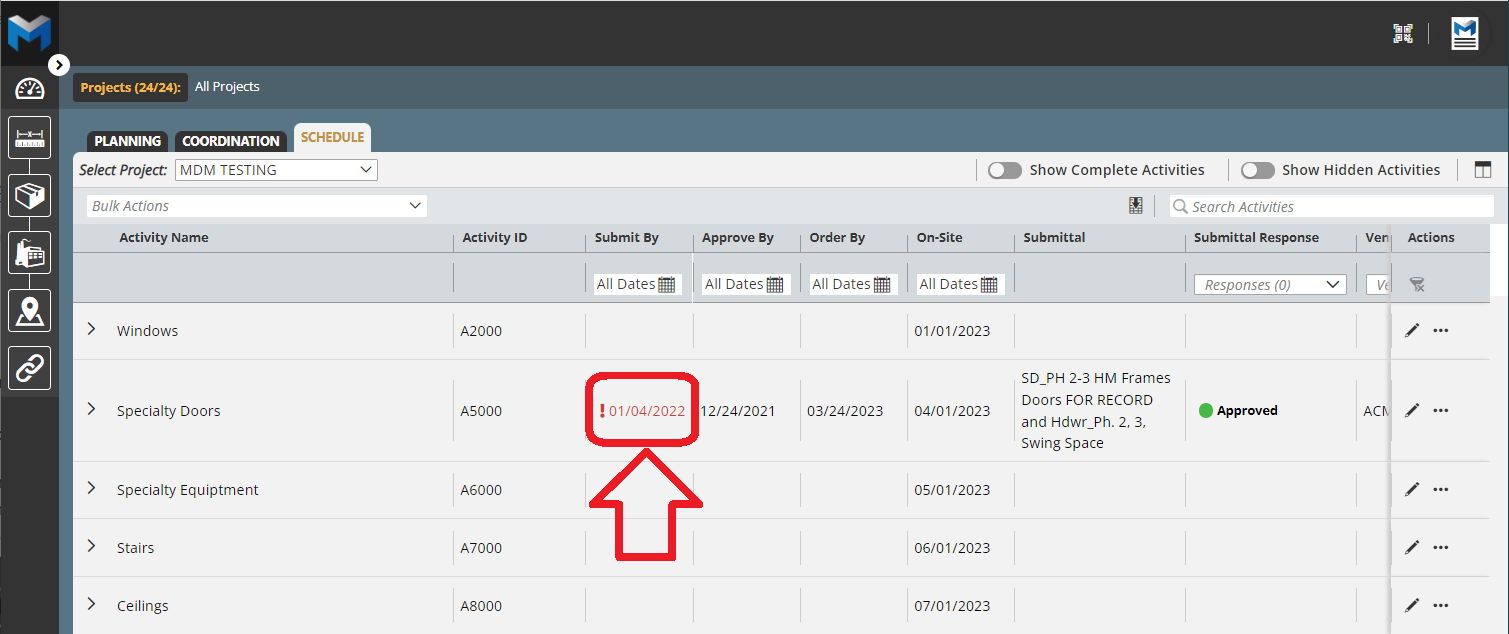
Managing Conflicts
There are several conditions that could cause dates to conflict, including:
- The schedules Onsite date may have changed
- Agreed-upon Submit By or Approved By dates may have changed in Procore
- The Vendor Lead Time Days may have changed
In any case, when a conflict occurs, whereby a date earlier in the workflow is later than a date later in the workflow, an Attention Indicator will flag the issue(s). In the example below, the Order By date has been pushed back ahead of the Approved By date.
The conflict can be managed in a number of ways:
- Take the necessary steps to have the Approve By date moved up and update those dates in Procore
- Take the necessary steps to have the Onsite date moved out, update and reimport the schedule
- Work with the sub-contractor to shorten the Vendor Lead Time Days and update that value for the item associated with the Activity
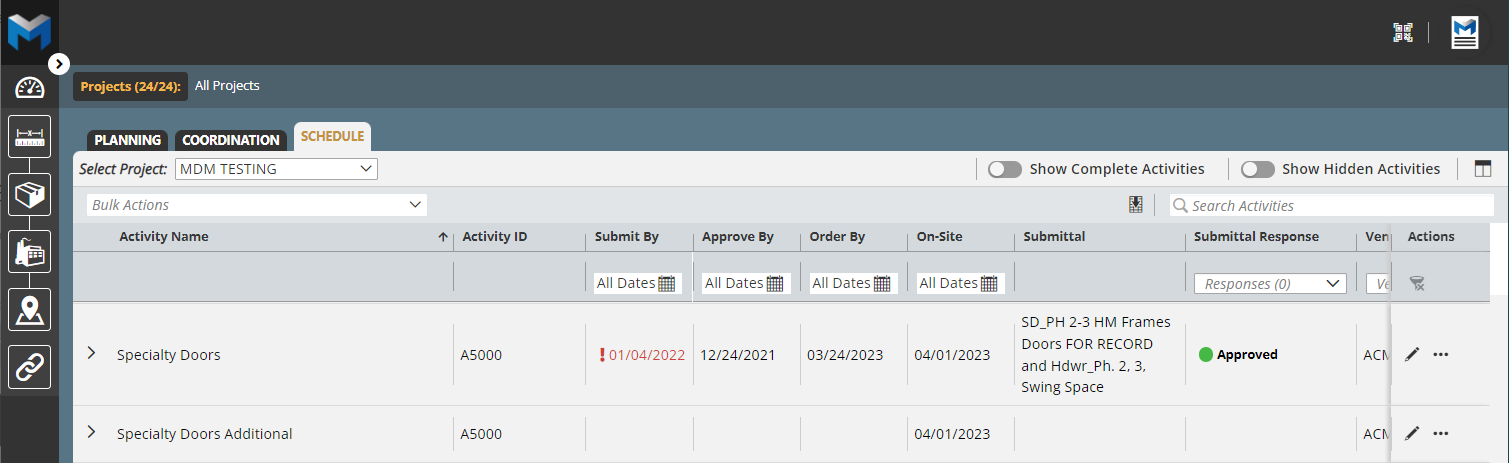
Cloning Activities
In the event that materials managed as part of an Activity need to be delivered on different dates and/or locations, that Activity can be Cloned:
- Select the Edit pencil for the Activity to be cloned
- Select Clone
- Give the cloned Activity an Activity Name Suffix
- Choose to Also Copy the Linked Submittal and/or Associated Items
- Select Clone

The cloned activity will have the same ID, and will respond to updates to the schedule for that ID. In addition, the cloned activity will have the Activity Name Suffix appended to the name.
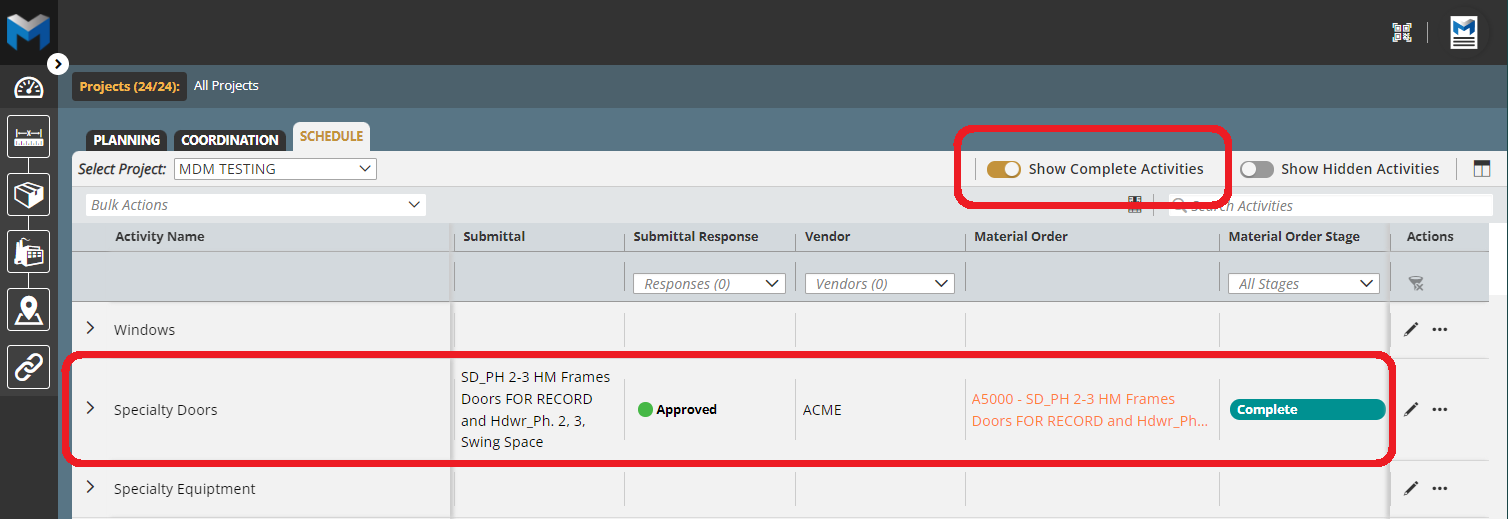
Completed Activities
Once an Activity is 100% completed, it will be removed from the by default. To show completed Activities, simply select the "Show Completed Activities" tool and all completed activities will be displayed in the list.
Comments
0 comments
Please sign in to leave a comment.